
One Room Challenge Week 2: The Plan

Welcome to Week 2 of the One Room Challenge! Today we'll be getting into the nitty gritty of the plan for what's going to happen with my office makeover. If you missed the first week (or if you're like, what the heck is the One Room Challenge?!), you'll want to start here with Week 1.
Last week, I shared the before photos and my inspiration, and to jog your memory, here's the current status of the office:


The room is oddly shaped and has a few challenges to contend with, but it gets a ton of natural light (which is a real treat in an old row home like ours!) and it's a good size for an office. It's hard to get a sense of the size and shape of the room without a bird's eye view, so below is the floor plan along with the future setup of the space. The idea is to have this room serve as not only the Mix & Match office, but also be a mini lounge space for reading and the occasional TV watching. I spend the majority of my days here, so it's about time it got a fresh look!

I'm planning to reuse a few of my existing pieces, but for the most part, I'm bringing in new items that you can see ]in the design board below. It's not 100% to scale or an exact representation of the setup, but it'll help you get a sense of what everything will look like all together. This is something I do for all of my full room design board clients, and they find it really helpful. I figure if I'm going to be my own client, I might as well do it right!

Overall, the vibe I'm going for is clean-lined and modern with a touch of eclectic/bohemian. The scheme will center around blues, white, natural wood, and brass. That overdyed dark blue and teal rug* is on its way here, and I think it will really ground this space and provide some good noise dampening. Our house is pretty small and noise definitely carries and bounces off those hardwood floors.
When you enter from the hallway, your eye immediately goes to the back of the room, which is where the desk is under the window. The new desk arrived a few weeks ago, and I tried it in several different spots, but it seems to work best where the old one was. (FYI - it won't be floating in the middle of the room like in the design board above. It will face the window.) As you can see in the floor plan, just to the left of the desk is a 3'4" wide nook. Ever since we moved into this house, I thought that nook would be ideal for some kind of bookshelf, and I found the perfect one in the 96" Stairway bookcase from CB2, which fill the width and depth of the space really well, and goes nearly all the way to the ceiling, making it look almost built in. It's going to be great for office supply storage and will be a fun spot to style up!
If you do an about face from the desk area so that you're looking at the double closet, you'll find yourself in the "lounge" part of the room. Lounge might be a bit generous (ha!) - it'll be more like a reading nook where you can flip on the TV every once in awhile - but let's go with it. I'll be using a Crate & Barrel slipper chair we already own (sadly, they don't make it anymore, but this one is similar), and we can always bring in an extra chair when needed if more than one person wants to hang here. There's a small radiator to contend with next to the window, so it's not ideal to always keep two chairs in that space.
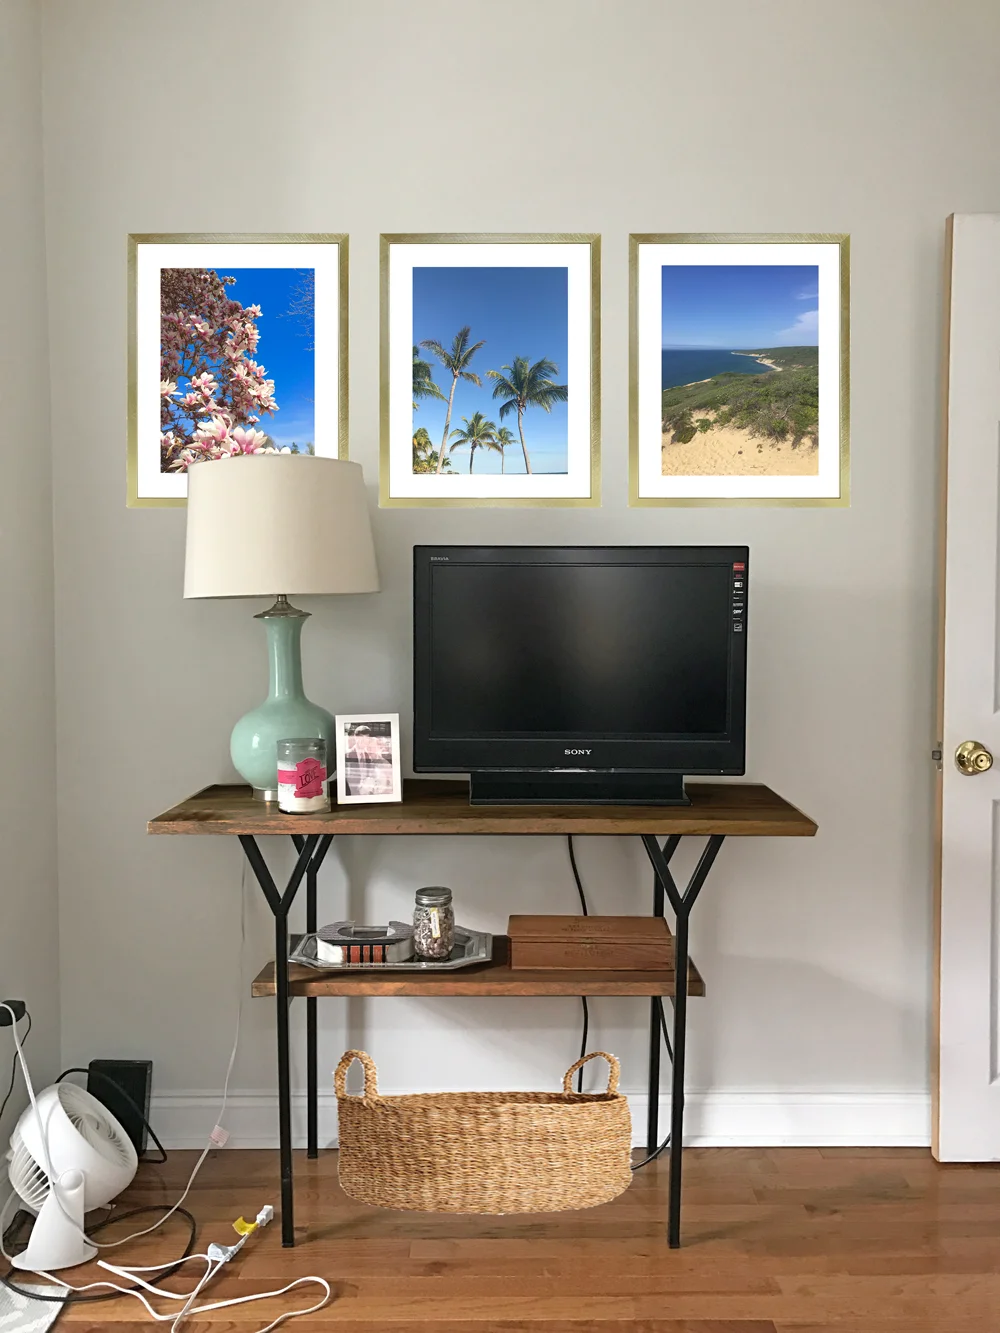
The TV is finally getting a permanent home after occupying a space on the floor for way too long (yikes!). We don't watch a lot of TV, so having it in the office for occasional use is perfect for us. I found a great two shelf console table at HomeGoods for it, but I think the wood is a little too light. I did a little bit of photoshopping to show what it would look like in a darker stain or painted white, and added in the brass frames that will eventually hang on the wall behind it. I haven't made the final call yet on what to do with that piece, so if you have an opinion, now is the time to share it!
Here's the original (please ignore the crazy mess going on in the lower left corner!):

Dark stain:
Painted white:

And finally, let's talk about that double closet. Those bifold doors you saw in the "before" photo back toward the top of the post are kind of the worst (they've gotta go!), but since we store a lot of miscellaneous items like tools, games and home decor in there, we do need to be able to close them off. I've ordered some light gray curtains from H&M (one of my secret affordable home sources that I wrote about in this Best Of post!) that I'm hoping will work perfectly. I've been going back and forth on whether to hang them on inside-mount rods, or on rods that are hung high above the trim, and I think I've settled on inside mount. They'll be closed almost all of the time, and I'd like to be able to show off the pretty moulding that frames the closets and not have that wall look like a sea of curtains. :)
So now that we've talked about the general plan, I've got a bunch of specific "to dos" - including some of the less fun stuff like painting trim - that need to happen over the next few weeks to turn this design plan into reality. I've made most of the purchases, and a lot of the items are here and ready to be installed, so hopefully I'm on track!
Here's the master to do list:
- Remove anything that doesn't have a permanent home in the room
- Paint door, trim, and baseboards Ultra Pure White by Behr to match the rest of the house
- Assemble and install the new desk
- Assemble and install the bookcase
- Install the rug
- Style the bookcase and TV console
- Figure out task and ambient lighting for the room
- Remove bifold doors and patch/paint holes
- Install rods and curtains
- Replace dated brass doorknob with brushed nickel to match others in the house
Whew! That's quite a list, but I'm feeling good about how things are moving along. Next week, I should have some good progress to share with you. Make sure to follow along on Instagram - I'll probably share some behind the scenes stuff on my Stories in between posts!
If you're interested in the sources for the products on the design board, you can shop the mood board below for many of them! Simply hover over the item you're interested in (or tap an item with your finger if you're on a mobile device) and click on the black and white plus sign that pops up. If you're on a feed reader or receiving this in your email, you'll need to click over to the full website to use this tool.

*This post contains affiliate links. That means when you buy through my links, I'll earn a small commission from your purchase at no cost to you. Thanks for supporting Mix & Match in this way!
